Connect Your Bleskomat ATM to LND via Bleskomat Platform
Lightning Network Daemon (LND) is one of the original Lightning Network node implementations. It is written in Go and created by Lightning Labs. It is a free and open-source project and its source code repository can be found here.
Setup LND
A complete guide to setting up your own instance of LND can be found here. This comprehensive guide is written directly by the Lightning Labs team. You can follow the instructions up until the “Deposit some Bitcoin” section for now. Once you have reached that point in the LND documentation you can continue to the next step in this guide.
Connect your Bleskomat Platform account to LND
Let’s now connect your Bleskomat Platform account to your LND wallet.
- Login to your Bleskomat Platform account
- For first time login:
- Find and click the “Redeem Link” in the email that you received after placing your order.
- Select “Create a new account” from the list of options in the “Action” field.
- Click the “Confirm” button.
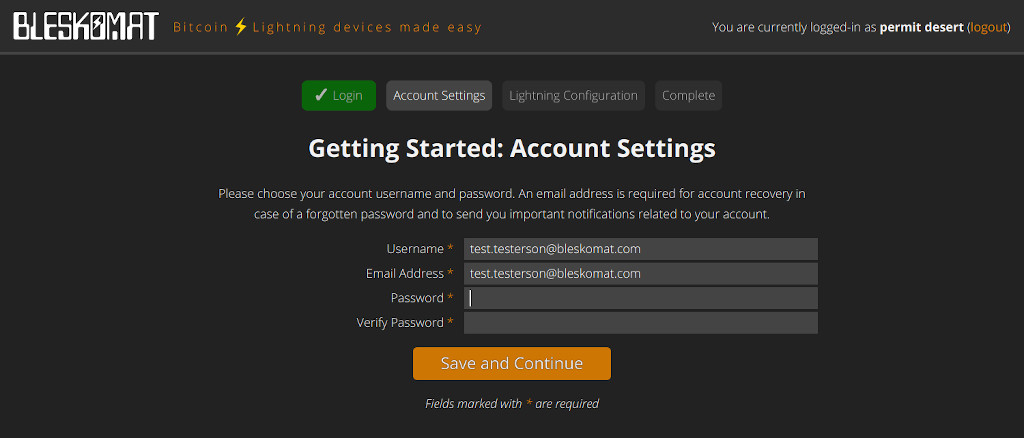
- Complete the Account Settings step to set an email, username, and password.
- For first time login:
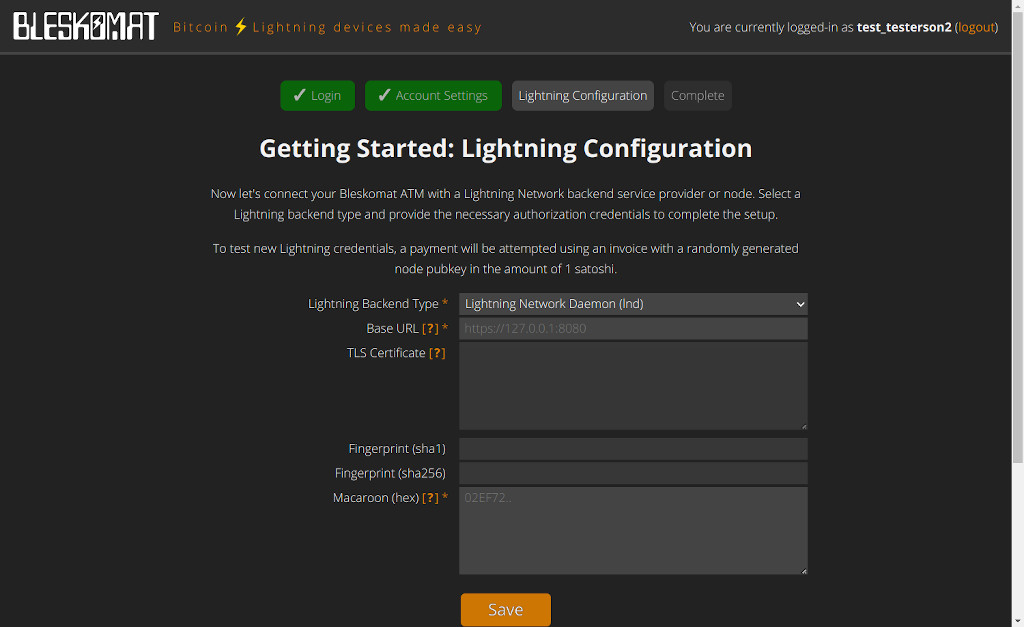
- Lightning Configuration
- Select “Lightning Network Daemon (lnd)” from the list of options for “Lightning Backend Type”
- In the Hostname field enter the IP Address and port number of your lnd node’s REST API
- The TLS Certificate is automatically requested from the service hosted at the Hostname provided above.
- Important: Check the TLS certificate in the form against the tls.cert file used by your lnd node.
- In the Macaroon field paste the hexadecimal representation of a macaroon for your lnd node
- The macaroon should have permissions to pay invoices and check invoice status.
- Use the command
xxd -c 10000 -p -u /path/to/macaroonto print a macaroon file as hexadecimal. - It is possible to “bake” custom macaroons with specific permissions using lncli’s
bakemacarooncommand. See Bakery for more details.
- Save and complete the initial account setup
- Management Interface
- Click “Devices” on the left side of the account screen
- If you don’t find any devices yet, click the “Create new device” button.
- Click the gear icon on the right side of one of the listed devices
- This will open the device’s settings page
- Note the various settings available:
- Enabled – Whether or not the Bleskomat Platform will process payments on behalf of the ATM
- Device Type – Various types of devices supported by the Bleskomat Platform:
- ATM – The full-sized product version of the Bleskomat ATM
- Do-it-yourself ATM – The DIY hardware project
- Point-of-sale – The POS terminal device
- Fiat Currency – The currency (bills and coins) which your ATM accepts. Changing this requires re-programming the bill and coin acceptors.
- Buy Limit – The maximum per trade limit for the ATM
- Exchange Rate Provider – The exchange rate API to use when fetching BTC to fiat exchange rate
- Fee Percent (%) – The percent amount deducted from the final BTC amount when sending Lightning payments –
- Fixed Fee – A fixed fee denominated in the fiat currency of the device
- Custom Invoice Memo Prefix – If set, this will replace the default invoice memo prefix – e.g. Bleskomat (absurd cake). Your ATM customers will see this in the memo field of their wallet application’s invoice.
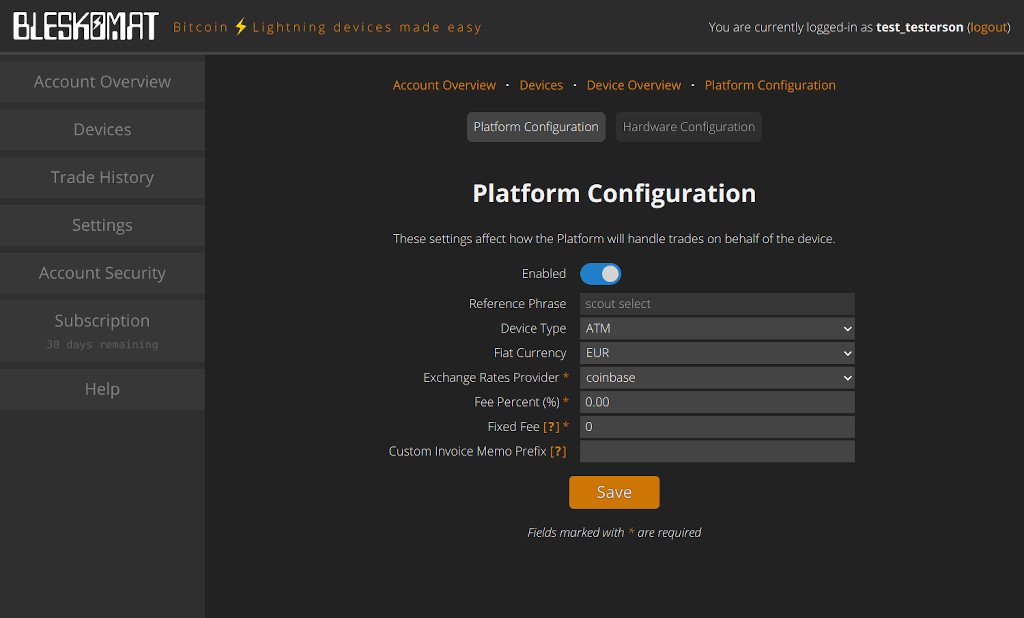
- Press the “Save” button to save the settings, in the case that you’ve made any changes.
Configure Your Bleskomat ATM
In order for your Bleskomat ATM to create QR codes that the Bleskomat Platform will accept, you must configure it using the Hardware Configuration tool in your Platform account. This requires a USB cable and a web browser with Web Serial support – e.g. Chrome, Chromium, Brave, and Edge.
- Connect your Bleskomat ATM to your computer via USB cable
- Open the “Hardware Configuration” page in your Bleskomat Platform account
- Click the “Connect” button
The tool should automatically connect to your Bleskomat ATM. Then it will check if the device has the latest firmware installed. If not, it will ask you if you would like to update it. After firmware is updated, a few automatic checks are performed before the hardware configuration options are presented.
Once the Hardware Configuration tool is finished, you can move on to the next step.
Fund your wallet
The final step is to fund your LND wallet with some sats! Since LND is a Lightning Network node, you are responsible for opening and managing your payment channels. To do this, continue from Part 3 of the LND setup guide.
If you only use your LND node for sending payments via the Bleskomat ATM, then you only need a local balance in your channels. But once your local balance is exhausted and all of your channels’ balances are remote, you will need to re-balance these channels. Have a look at the following guides to learn more about this:
- How to rebalance Lightning Network channels
- https://blog.lopp.net/lightning-network-liquidity-management-guide/
Once you have your wallet funded and a channel open, you can try a test payment using your Bleskomat ATM.
Test the setup
Now let’s test the whole setup to make sure it’s working as expected.
- Insert a coin or bill into the Bleskomat ATM
- Push the button
- Open a compatible mobile wallet app
- Please see apps for a list of wallet apps which are compatible
- Scan the QR code with the mobile wallet app
- Follow the instructions in the mobile wallet app to complete the Lightning payment
If this worked, congratulations your Bleskomat ATM is now connected and ready to sell sats!